

Friday
Whats in my camera bag?
I've always been really interested in looking in other peoples camera bag, so I thought i'd share a annotated image of mine.


Photoshop tutorial | Photojoiner
Photojoiner is a technique first performed by David Hockney.
Here's how I made the picture below.
1. Open your picture you want to use, and a new blank A4 document.


Here's how I made the picture below.
1. Open your picture you want to use, and a new blank A4 document.

2. Select a random part of the picture and copy it
\

3. The paste this into your new document.
4. Repeat this step several times until you have the desired effect. Here's mine.


Thursday
Top 10 must have accessories | Portrait photography
Top 10 must have camera accessories for portrait/studio photographers
1. Tripod
2. External Flash
3. Light meter
4. Wireless flash trigger
5. Backdrop
6. Props/dress changes/make up
7. A stool
8. Stool
9. Reflector
10. Green Screen
Top ten must have accessories | Wildlife/landscape photography.
Top 10 must have camera accessories for landscape/wildlife photographers
1. Tripod
2. Lens
3. UV Filter
4. Zoom lens
5. Spare batteries
6. Spare Memory cards
7. Binoculars
8. Stool/sheet to sit on
9. Bottle of water
10. Mobile phone
Studio photography - Headshot
Today I worked on some photographs I had taken in the studio a while back, below you will see a before and after ad see how I achieved it.
1. I cropped the picture into a nice rectangle.
2. Used levels to brighten the picture correctly and used the select white tool to get rid of the background.

3. I then made the curves into a very slight "S" shape to improve the contrast.
4. Next I airbrushed the face a little by painting on a layer of her skin tone (used eye dropper) then added noise Filters > Noise > add noise, and blurred it appropriately Filter > Blur > Gaussian blur.
5. With this layer on top I reduced the opacity to about 40% - play around with this until it looks right. Turn the layer on and off to see the difference :)
6. The final two steps were a small adjustments to the levels again just to neaten up the airbrush layer.
7. Then I flattened the image.
8. Lastly, I added a vignette Filter > Lens correction > Custom > Vignette (The "midpoint" and "amount" sliders)


1. I cropped the picture into a nice rectangle.
2. Used levels to brighten the picture correctly and used the select white tool to get rid of the background.
4. Next I airbrushed the face a little by painting on a layer of her skin tone (used eye dropper) then added noise Filters > Noise > add noise, and blurred it appropriately Filter > Blur > Gaussian blur.
5. With this layer on top I reduced the opacity to about 40% - play around with this until it looks right. Turn the layer on and off to see the difference :)
6. The final two steps were a small adjustments to the levels again just to neaten up the airbrush layer.
7. Then I flattened the image.
8. Lastly, I added a vignette Filter > Lens correction > Custom > Vignette (The "midpoint" and "amount" sliders)
Before.

After.

Wednesday
Night time photography
To achieve these effects I did the following simple steps.
- Placed camera on tripod and pointed at the moon.
- Set the shutter speed to 4 seconds with an aperture of F5.6
- Flash ON
- Took the photograph.
- Enhanced it in photoshop using only levels.
and here's the finished result!!

- Placed camera on tripod and pointed at the moon.
- Set the shutter speed to 4 seconds with an aperture of F5.6
- Flash ON
- Took the photograph.
- Enhanced it in photoshop using only levels.
and here's the finished result!!

Time lapse - Clouds
I did this time lapse in the same way i've done the rest, scroll down for a tutorial!
Photography tutorial - Multiple flash
Multiple flash is a technique that ought to be done in the studio.
You will need.
Dark room with black backdrop
External flash
DSLR
Firstly, set the shutter speed on you camera to "Bulb" This means the shutter will stay open as long as you hold the shutter release down.
Next you'll need an assistant and a model.
With the lights turned off, open your shutter - keep it opened.
Have your model pose in the first position, and ask your assistant to fire the flash.
The have your model move into the next position and have your assistant fire the flash, do this as many times until you're happy with the photo, and then release the shutter release.
You'll end up with a photo like this.


You will need.
Dark room with black backdrop
External flash
DSLR
Firstly, set the shutter speed on you camera to "Bulb" This means the shutter will stay open as long as you hold the shutter release down.
Next you'll need an assistant and a model.
With the lights turned off, open your shutter - keep it opened.
Have your model pose in the first position, and ask your assistant to fire the flash.
The have your model move into the next position and have your assistant fire the flash, do this as many times until you're happy with the photo, and then release the shutter release.
You'll end up with a photo like this.


Tuesday
Designing in Photoshop - How to add a bleed.
If you are designing something to be sent off for professional print, it is essential you add a "Bleed" A bleed is an area of "No mans land" around the design that will be cut off during printing, if you fail to add a bleed some of your design will be cut off.
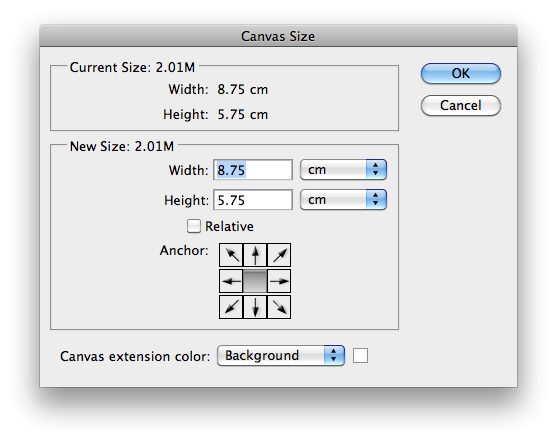
To add a bleed go to Image > Canvas size


To add a bleed go to Image > Canvas size

Then you'll see the canvas size window that looks like this, you'll want to add about 6 or 7 pixels. I added 2mm
If you do this after you've finished designing you wont have to worry about it while you're making it. Remember to select and delete anything that is in the bleed area, though.
As you can see I've done here.

How to create flame photography with smoke - Photography Tutorial
Smoke photography is something I love doing, today I took a different spin on it and using the simple set up you can see here created some amazing shots.


After opening the photographs in photoshop I cropped them appropriately and used levels to completely darken the background. Ensuring I used the red channel to lighten the flame.
I then lightened the blue channel slightly in curves, and improved the contrast overall as a photo.


After opening the photographs in photoshop I cropped them appropriately and used levels to completely darken the background. Ensuring I used the red channel to lighten the flame.
I then lightened the blue channel slightly in curves, and improved the contrast overall as a photo.
Here's one of the original images.

And heres the results..


Subscribe to:
Posts (Atom)