Showing posts with label photoshop tutorial. Show all posts

Friday

Photoshop tutorial - Computer generated movement.


Computer generated movement.

Sometimes in photography, a photographer may want to capture the movement of a particular subject which he wishes to do, However cannot do for whatever reason, be it the subject moves to fast, or the subject moving is harder to find. This is where computer generated movement comes in, we take a still image of the subject then make it look like it’s moving in photoshop.
  1. Take a still image of your desired subject
  2. Put that image inside of photoshop
  3. Select the subject you want to be blurred
  4. Inverse the selection
  5. Filters > Blur > Motion blur
  6. Select 90 Degrees
  7. Ensure preview is ticked
  8. Adjust the blur distance slider as appropriate

Thursday

Photoshop tutorial - Text Gradient


It's often often handy to be able to have a gradient covering a text field in photoshop, especially when your wanting to design some text for print products or even web design. 

I'll show you how. 


Step 1 - Type the text you want to add a gradient using the text tool 


Select the gradient tool from the Photoshop toolbar


Create a new layer (CMD/CTRL + SHIFT + N)


Select your two colours - I always prefer to have the darker colour on the bottom


On you new layer - draw a gradient over the text 


On the gradient layer right click and select "Create clipping mask"


Once ouve done that you should have a gradient covering your text, as shown below! 

Tuesday

Photoshop CS5 - Skin smoothing - How to smooth a models skin.

In this tutorial I will show you how to achieve that magazine-finish skin every time, in a few simple steps.

Here is the picture I am working with


Step 1 is to crop the image to the correct size, as I've done below.


Step 2: Create a new layer and label it "Skin"


Step 3: Using your EyeDrop tool found in the colour palette, select a colour from the models skin


Once you've done this you'll need to draw on a very crude mask of the particular colour. I KNOW it looks dodgy at this stage, but bear with me. 


THE NEXT STEP:

Is add a Noise filter of about 12 radius, I don't have a screenshot but the filter can be found here. 

Filters > Noise > Add noise

No we need to blur our skin by going to Filter > Blur > Guassian Blur


Blur this from between 20 and 25 pixels.

Once you've done that all you need to do, is to bring the opacity of this layer down to around 20 %


Here's the before and after!!


All I did here was a basic crop, a basic skin smooth, and a few levels and curves tweaks!


Friday

Photoshop tutorial | Photojoiner

Photojoiner is a technique first performed by David Hockney.

Here's how I made the picture below.

1. Open your picture you want to use, and a new blank A4 document.


2. Select a random part of the picture and copy it
\

3. The paste this into your new document.

4. Repeat this step several times until you have the desired effect. Here's mine.


Wednesday

Photography tutorial - Multiple flash

Multiple flash is a technique that ought to be done in the studio.

You will need.

Dark room with black backdrop
External flash
DSLR

Firstly, set the shutter speed on you camera to "Bulb" This means the shutter will stay open as long as you hold the shutter release down.

Next you'll need an assistant and a model.

With the lights turned off, open your shutter - keep it opened.

Have your model pose in the first position, and ask your assistant to fire the flash.

The have your model move into the next position and have your assistant fire the flash, do this as many times until you're happy with the photo, and then release the shutter release.

You'll end up with a photo like this.

Tuesday

Designing in Photoshop - How to add a bleed.

If you are designing something to be sent off for professional print, it is essential you add a "Bleed" A bleed is an area of  "No mans land" around the design that will be cut off during printing, if you fail to add a bleed some of your design will be cut off.

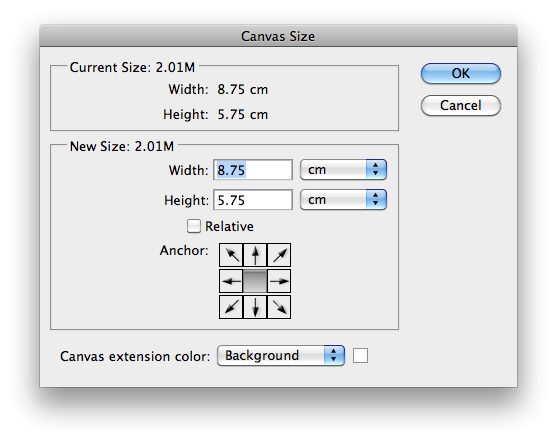
To add a bleed go to Image > Canvas size


Then you'll see the canvas size window that looks like this, you'll want to add about 6 or 7 pixels. I added 2mm


If you do this after you've finished designing you wont have to worry about it while you're making it. Remember to select and delete anything that is in the bleed area, though. 

As you can see I've done here.


How to create flame photography with smoke - Photography Tutorial

Smoke photography is something I love doing, today I took a different spin on it and using the simple set up you can see here created some amazing shots.


After opening the photographs in photoshop I cropped them appropriately and used levels to completely darken the background. Ensuring I used the red channel to lighten the flame.

I then lightened the blue channel slightly in curves, and improved the contrast overall as a photo.

Here's one of the original images. 


And heres the results..


Monday

Photoshop for beginners: Drop Shadows

When used correctly, the drop shadow tool in photoshop can create very professional images.


Looking at the image above, we can see that a more subtle shadow looks more professional, the version at the top is the standard set for photoshop.

To create a drop shadow on some text, start by double clicking the text layer to reveal this window:

Go ahead and tick the "Drop Shadow" option, then select it to reveal the controls.

It's often a good idea to set the "Size" value larger than the "Distance", to achieve the affect above, I used an angle of 90, distance of 1px, size of 2px and set the opacity to 41%:

you can use a variety of sizes, blend modes, colours, distances and contours to achieve different effects

Photoshop tutorial - Dramatic Skies.

In a lot of my pictures I often edit my sky heavily, and leave the photograph body largely alone. Heres how to create dar dramatic skies, baring in mind the original sky was bright blue.

1st you'll want to open the photography in photoshop, and select the sky. You can use the various selection tools avaliable.

Next open your levels window (CMD/CTRL + L) and drag the ends to the end of the graph.

The open curves and drag the top diagonal top point until the sky is the effect you were after. Here's an example of mine.

email me if you get stuck matt.cowlin09@gmail.com


Photoshop Tutorial - Selective Colour.

Selective colour is a really nice technique to be able to master. It gives the photograph the ability to have a main focal point, and you get to chose the focal point.

Step 1. Open the photograph you want to use in photoshop

Step 2. Select the object you want to remain in colour using the selection tools.


Step 3. Use Standard Mode (Q) to adjust the selection like you can see I have done here.

Step 4. Press Q again to get back to normal selection, now you'll want to feather this by about 5 pixels. Select > Modify > Feather 

Step 5. Now invert your selection (CMD/CTRL + Shift + I). 

Step 6. Go to Image > Adjustments > Hue/Saturation


Step 7. Drag the saturation slider all the way down (Although I like to leave a tiny bit of colour in, so you can adjust this as you wish)

Press Enter and here is the finished product!!


Sunday

Photoshop tutorial - How to add brushes in Photoshop

Adding brushes in photoshop is easy and so useful. I add brushes and fonts on a regular bases just so that i've got more to chose from when i'm designing. Just follow these few simple steps:

First you'll need to download whatever brushes from the web, there are loads about so just google what brushes you want, for example I searched "Horse photoshop brushes download"

1. Select the brush tool from the left hand side


2. From where you select your brush on the top bar press this arrow.


Now you're ready to load your brush.
3. From the drop down list select "Load brushes..."


4. Select this then locate your downloaded brushes and double click.


5. Select your brush and start drawing!! Here's my finished result.


Saturday

Photoshop for beginners: Strokes

People that create images in Photoshop, in particular Photoshop CS3 and above, will use strokes. They also use them with text and shapes. Photoshop provides different variations of what strokes you can add to your image.

Using Photoshop CS5, select a file that you wish to use to implement a stroke with. Choose the layer in which you want to use to apply the stroke. You will fnd this in the Layers palette. When it is chosen, the layer will be highlighted.


Using the right click button from your mouse, select “Blending Options”. You will see the Layer Style dialog box.


In the Layer Style box, you will find the “Stroke” component in the Styles listing. You will see it on the left side of the box.


This is where you can set up your stoke with a variety of different options:

  • Stroke size - This is how many pixels think you want the stroke to be
  • Position - This is where you select wether the stroke lies on the outside, inside, or on the perimeter
  • Opacity - This is where you can select exactly how solid the line appears, this is good for adding transparency and making your stroke more subtle
  • Colour - This is where you can choose the colour of the stroke
More advanced options like blend mode and fill type are also present.